Transform your home into a self-sustaining energy hub by installing a solar electric system – a powerful investment that pays dividends in both environmental impact and long-term savings. Modern solar technology has made it possible for homeowners to generate their own clean electricity, reducing monthly utility bills by 50-90% while increasing property value by an average of 4.1%.
Installing a solar electric system involves careful planning, precise execution, and attention to detail. Whether you’re considering a DIY approach or working with professional installers, understanding the fundamental components and process ensures you make informed decisions for your home’s energy future.
This comprehensive guide walks you through the essential steps of solar system installation, from initial site assessment and system design to final inspection and grid connection. We’ll cover critical factors like roof orientation, shading analysis, equipment selection, and local permitting requirements – everything you need to know to successfully power your home with clean, renewable energy.
By following these proven installation methods and industry best practices, you’ll be well-equipped to join the growing community of homeowners who have embraced solar power, contributing to a more sustainable future while enjoying significant energy independence.
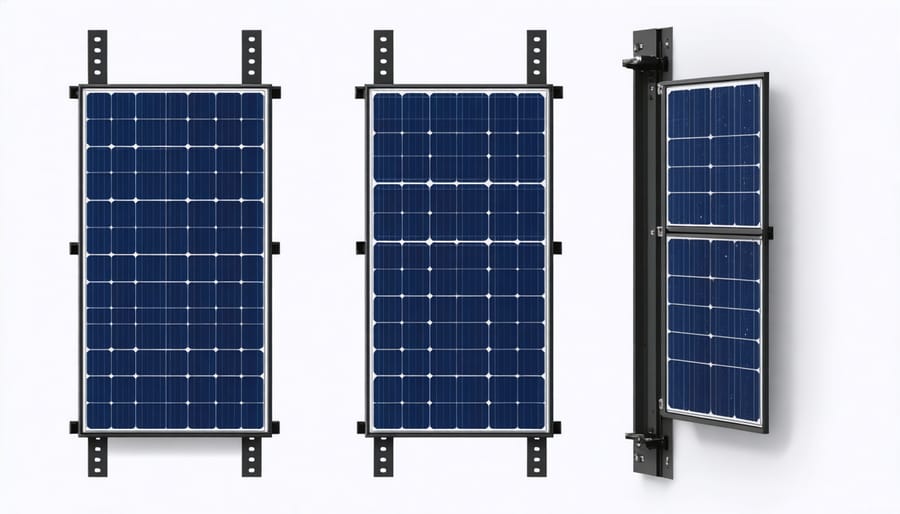
Understanding Vertical Solar Installation Basics
Advantages of Vertical Solar Installations
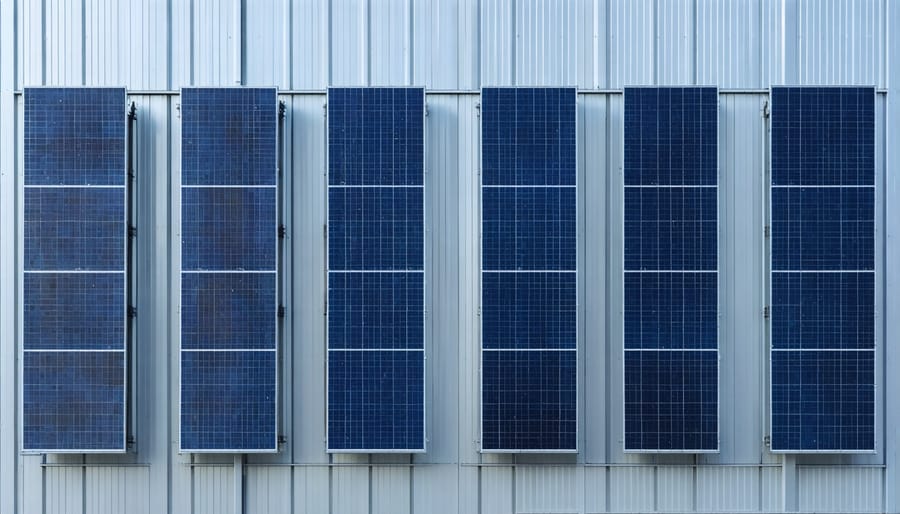
Vertical solar installations offer compelling advantages for homeowners seeking innovative energy solutions. While traditional roof-mounted systems dominate the market, different types of solar panels can be effectively installed vertically to maximize your property’s potential. One of the primary benefits is space efficiency – vertical installations make use of otherwise unused wall space, perfect for properties with limited roof area or unconventional layouts.
These installations can seamlessly integrate with your home’s architecture, creating a modern, sophisticated appearance. Many homeowners appreciate how vertical panels can double as privacy screens or architectural features while generating clean energy. During winter months, vertical panels can actually perform better than their roof-mounted counterparts, as they’re positioned at an optimal angle to capture low-lying winter sun.
Another advantage is their self-cleaning properties. Thanks to their vertical orientation, rain naturally washes away dirt and debris, reducing maintenance needs. They’re also less likely to accumulate snow or leaves, ensuring more consistent energy production throughout the year. For urban dwellers, vertical installations can effectively utilize sunny wall spaces while avoiding shade from neighboring buildings.
Site Assessment for Vertical Installation
Before mounting solar panels vertically, carefully assess your wall space to ensure optimal energy generation. Start by identifying south-facing walls, which typically receive the most sunlight throughout the day. Use a solar pathfinder or sun-tracking app to analyze how shadows from nearby buildings, trees, or structures might affect sun exposure throughout different seasons.
Your wall must be structurally sound to support the additional weight of solar panels and mounting equipment. Check for any signs of damage, such as cracks or water damage, and repair these issues before installation. Consider hiring a structural engineer to evaluate your wall’s load-bearing capacity and recommend appropriate reinforcement if needed.
Measure your available wall space carefully, accounting for windows, doors, and other obstacles. Leave adequate space around panels for maintenance access and proper airflow. Vertical installations typically require more surface area than roof installations to achieve the same power output, so calculate your energy needs accordingly.
Remember to check local building codes and homeowners’ association regulations regarding vertical solar installations. Some areas may have specific requirements for wall-mounted systems or aesthetic guidelines you’ll need to follow.
Planning Your Vertical Solar System
Required Components and Materials
To build your solar electric system, you’ll need several essential components that work together to generate and manage power. Here’s what you’ll need:
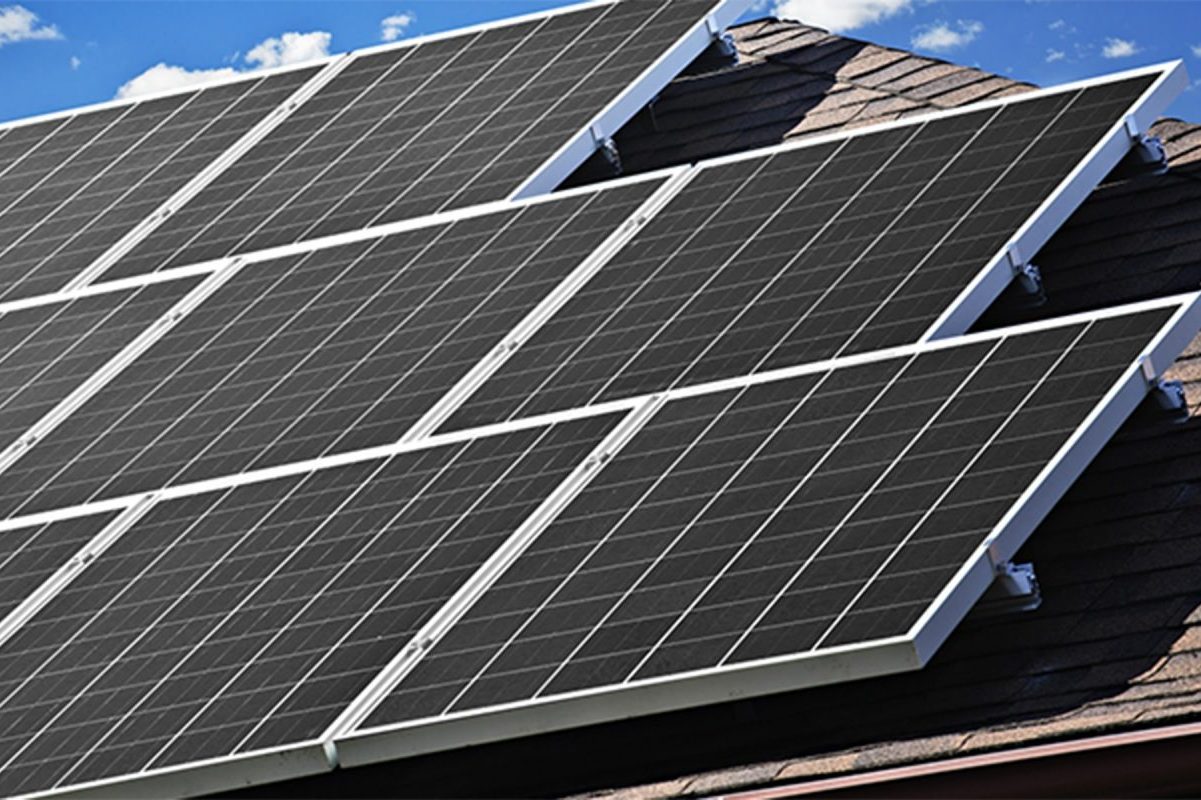
Solar Panels: High-quality photovoltaic panels are the heart of your system. Choose panels with appropriate wattage ratings for your energy needs, typically ranging from 250W to 400W per panel.
Inverter: This crucial component converts DC power from your panels into AC power for home use. Choose between string inverters for simple installations or microinverters for more complex setups.
Mounting Hardware: You’ll need a robust racking system, including rails, clamps, and brackets designed for your specific roof type. Don’t forget roof flashings to prevent water penetration.
Batteries (Optional): For energy storage, consider lithium-ion batteries. While optional, they provide power during outages and nighttime.
Electrical Components:
– DC disconnect switch
– AC disconnect switch
– Junction boxes
– Conduit and appropriate wiring
– Ground-fault protection
– Surge protection devices
Monitoring System: A monitoring device helps track system performance and energy production.
Additional Materials:
– Weather-resistant cable ties
– Silicone sealant
– Electrical tape
– Tools (wrench set, drill, multimeter)
– Safety equipment (gloves, safety glasses, fall protection)
Remember to check local building codes as they may require specific components or safety features for approval.
Permits and Regulations
Before installing your solar electric system, you’ll need to navigate through various permitting requirements and regulations. Most jurisdictions require specific solar installation permits and inspections to ensure your system meets local building codes and safety standards.
Start by contacting your local building department to understand the specific requirements in your area. Typically, you’ll need to submit detailed plans showing your system’s layout, electrical diagrams, and structural calculations. Many municipalities also require zoning permits, especially if you live in a historic district or have homeowners’ association restrictions.
The permitting process usually involves multiple inspections: one before installation begins and another after completion. These inspections verify that your system meets electrical codes, fire safety requirements, and structural standards. Your utility company will also need to approve your installation and may require additional documentation for grid interconnection.
While the permitting process might seem daunting, it’s designed to protect both you and your neighbors. Many solar installers handle these requirements as part of their service, but if you’re doing a DIY installation, be prepared to manage this process yourself. Some jurisdictions now offer streamlined or online permitting systems to make the process more straightforward for homeowners.
Remember to factor in permit fees and processing time when planning your installation timeline. Most permits are approved within 2-4 weeks, though this can vary by location.
Installation Process
Wall Preparation and Mounting
Before mounting your solar panels, proper wall preparation is essential for a safe and secure installation. Start by inspecting your chosen wall surface for any damage, cracks, or weak spots. Repair any issues and ensure the wall can support the additional weight of the solar system.
Using a stud finder, locate and mark wall studs – these will be your primary mounting points. For brick or concrete walls, identify solid areas for anchor points. Mark mounting locations according to your installation plan, ensuring they align with the panel arrangement and maintain proper spacing.
Next, drill pilot holes at the marked locations using the appropriate drill bit for your wall material. For wooden walls, use lag bolts that extend at least 3 inches into the studs. For masonry walls, install heavy-duty anchors rated for the combined weight of panels and mounting hardware.
Install the mounting brackets, ensuring they’re level both horizontally and vertically. Use a level tool to check alignment, and consider using a chalk line to maintain straight installation lines. Apply waterproof sealant around mounting points to prevent moisture penetration.
Double-check all bracket connections and ensure they’re firmly secured. The mounting system should feel solid and immovable when testing by hand. This foundation will support your solar panels for decades to come, so take time to verify each step before proceeding with panel installation.
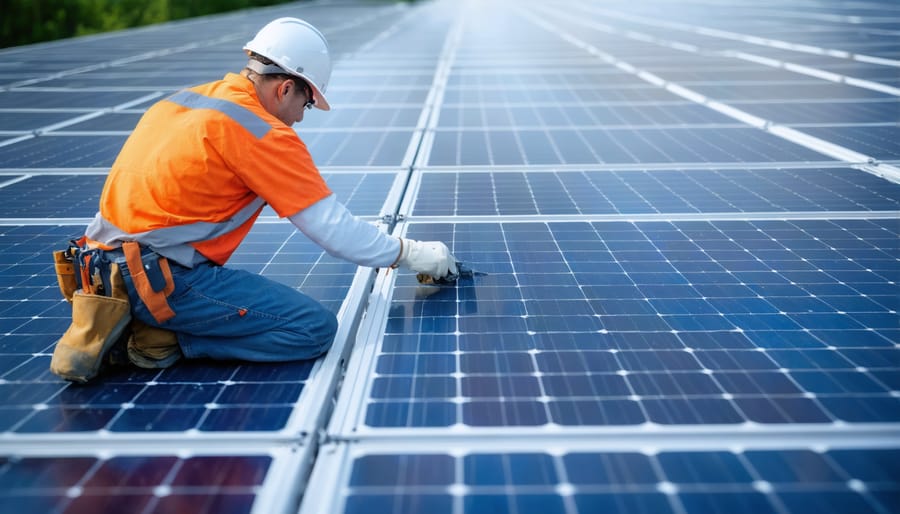
Panel Installation and Wiring
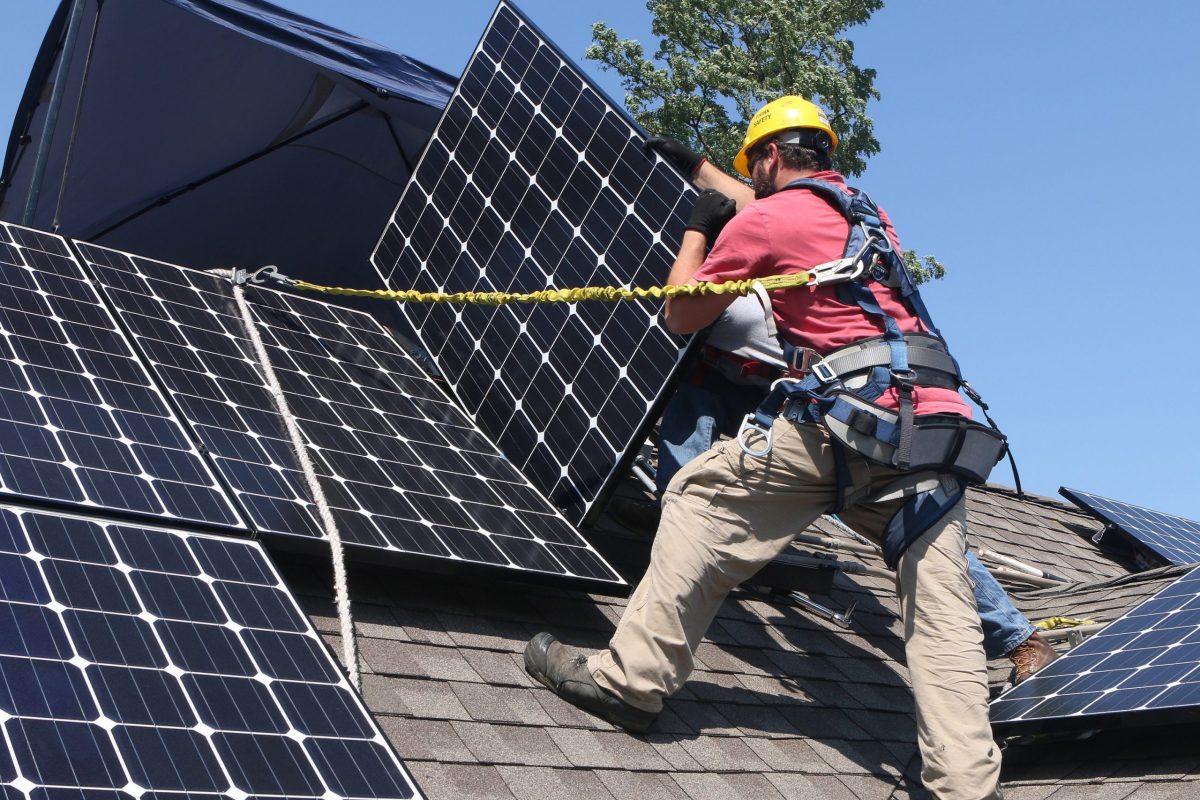
With your mounting hardware and brackets securely in place, it’s time to install the solar panels and complete the electrical connections. Start by carefully lifting each panel onto the mounting rails – this is best done with a partner to ensure safety and prevent damage to the equipment.
Align each panel according to your installation plan, leaving small gaps between panels for thermal expansion. Secure the panels using the manufacturer-provided clamps, ensuring they’re tight but not overtightened. Double-check that all panels are level and properly aligned before final tightening.
For the electrical connections, begin by connecting the panels in series or parallel according to your system design. Each panel comes with MC4 connectors that simply click together. Create a secure route for the cables underneath the panels, using UV-resistant cable ties to keep wires organized and protected from the elements.
Run the main DC cable from your array to your inverter location through conduit, ensuring all penetrations are properly sealed against water intrusion. Connect the grounding wire to each panel frame and the mounting system as required by local codes.
Before making final connections to the inverter, double-check all wiring with a multimeter to verify proper voltage and polarity. This helps prevent potential damage to your equipment and ensures optimal system performance. Remember to leave all disconnects in the ‘off’ position until your system is ready for inspection and commissioning.
System Testing and Optimization
Once your solar system is installed, it’s crucial to perform comprehensive testing to ensure everything works safely and efficiently. Start by conducting a visual inspection of all components, checking for secure connections and proper labeling. Your inverter display should show active power generation during daylight hours.
Work with your certified electrician to perform voltage tests at various connection points. This verifies that your system is producing the expected power output based on your installation specifications. Monitor the system’s performance through your inverter’s data tracking system or mobile app for at least a week to establish a baseline for normal operation.
To optimize performance, adjust the tilt angles of your panels seasonally if your mounting system allows for it. Clear any debris, dust, or snow that might accumulate on the panels, as these can reduce efficiency. Check for any shading issues that weren’t apparent during installation and trim back vegetation if necessary.
Pay attention to your energy consumption patterns and try to schedule high-energy activities during peak sunlight hours. This maximizes the direct use of your solar power rather than drawing from the grid. Many modern systems include monitoring features that can help you track and adjust your usage habits.
Document all testing results and baseline performance metrics for future reference. This information will be valuable for maintenance and troubleshooting if any issues arise later.
Maintenance and Care
Regular Maintenance Schedule
To keep your solar electric system operating at peak efficiency, establish a regular maintenance routine. Every three months, conduct a visual inspection of your panels for any visible damage, loose connections, or debris accumulation. Check for proper system performance through your monitoring system to ensure optimal energy production.
Clean your panels at least twice a year, or more frequently if you live in a dusty area or near trees. Follow these solar panel cleaning tips to safely remove dirt, leaves, and bird droppings that can reduce system efficiency. Use soft brushes and specialized solar panel cleaning solutions to avoid scratching the panels.
Monitor your inverter’s display panel monthly to verify it’s showing normal operation readings. Keep vegetation trimmed around ground-mounted systems to prevent shading and ensure proper airflow. During winter, clear snow accumulation using appropriate tools designed for solar panels.
Schedule professional inspections annually to check electrical connections, mounting hardware, and overall system performance. This helps identify potential issues before they become serious problems and maintains your warranty compliance.
Troubleshooting Common Issues
Even the best-planned solar installations can encounter challenges, but most are easily resolved. If your panels aren’t producing expected power levels, first check for shade from nearby trees or structures that might have been overlooked during planning. Clean any dust or debris accumulation, as this can significantly impact efficiency.
For mounting issues, ensure all brackets are properly aligned and tightened to manufacturer specifications. If you notice any loose connections, don’t attempt to fix electrical components yourself – contact a certified electrician. Water seepage around roof mounting points can be addressed by properly applying weatherproof sealant and ensuring flashing is correctly installed.
When your monitoring system shows irregular performance, check that all inverter connections are secure and that the wifi connection is stable. Strange noises from the inverter might indicate fan problems or internal issues requiring professional attention.
If you notice significant drops in energy production, have your system inspected annually by a qualified technician. Most issues can be prevented through regular maintenance and prompt attention to minor problems before they escalate.
Installing a solar electric system is a transformative step toward energy independence and environmental stewardship. By following the steps outlined in this guide, you can confidently navigate the process of bringing clean, renewable energy to your home. Remember that proper planning is crucial – from assessing your energy needs and available space to securing necessary permits and selecting quality components.
While the installation process may seem complex, breaking it down into manageable steps makes it achievable, whether you choose to work with professionals or take the DIY route. The initial investment in solar technology pays dividends through reduced energy bills, increased property value, and significant environmental benefits.
Don’t let common misconceptions about solar installation hold you back. Modern solar systems are more efficient, affordable, and durable than ever before. With proper maintenance, your solar electric system can provide reliable power for 25 years or more.
Take action today by starting with a thorough site assessment and energy audit. Connect with certified solar installers in your area, or if you’re handy, begin gathering the necessary resources for a DIY installation. Remember to check local regulations and incentives – many regions offer substantial tax breaks and rebates that can significantly reduce your initial costs.
By investing in solar power, you’re not just creating a sustainable energy solution for your home; you’re participating in the global shift toward renewable energy and a cleaner future.